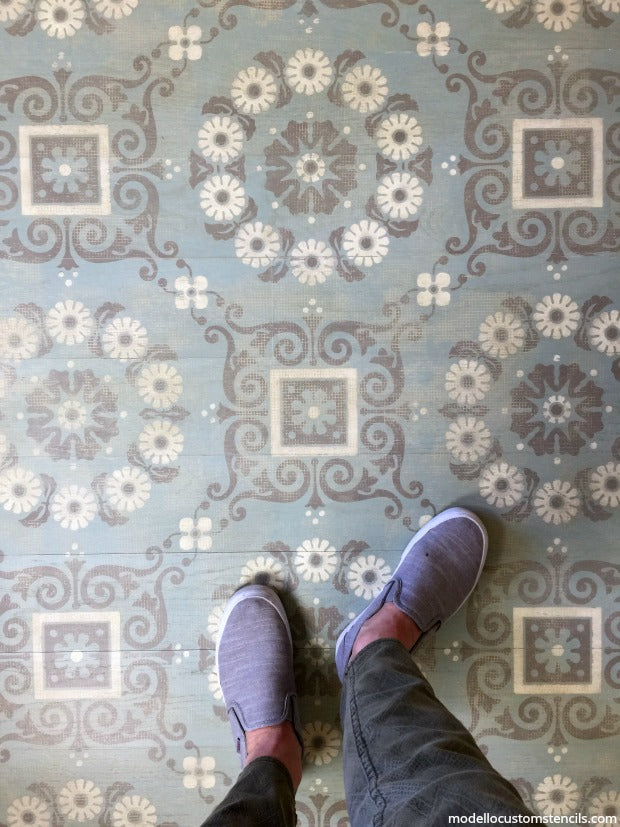
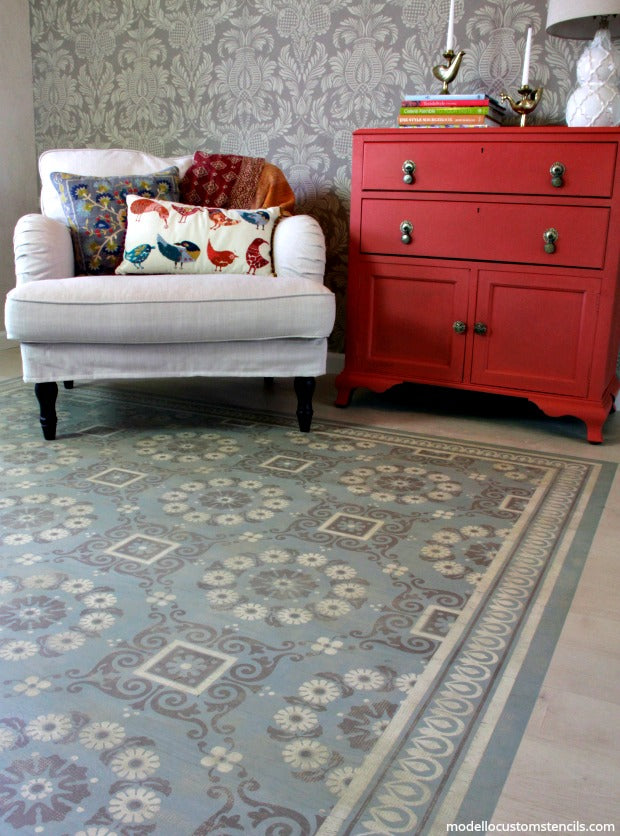
How to Paint a DIY Rug with Custom Floor Stencils
We’ll let you in on a little secret… You can have the rug of your dreams by using Modello® floor carpet stencils! Modello® stencils make decorating creative and customizable. They also make the perfect easy-to-clean and durable rug since it’s not fabric! You can sweep and mop your DIY faux rug as you would the rest of the floor. The one-time use vinyl Modello® stencil used here is Bristol CC149 from the Carpet Stencil Collection. Watch this helpful video on how to apply and paint Modello® vinyl stencils… Prepare to be floored!
Supplies:
- Bristol CC149 from the Carpet Stencil Collection
- Squeegee and weeding tool (included in every order!)
- Annie Sloan Chalk Paint in Duck Egg, Louis Blue, Chateau Gray, Coco, Old White, Old Ochre
- Annie Sloan Lacquer Floor Finish
- Nylon rollers, foam Rollers, & paint trays
- 1” & 2” painter’s tape, electric sander, measuring tape, chalk line, T-square, rags, cheesecloth, scissors, needle point plastic canvas
All Modello® stencils consist of three layers:
- The protective Backing Paper which protects the adhesive side of the stencil
- The cut vinyl stencil pattern
- The translucent Transfer Tape that is applied after production to hold the pattern together as it is transferred to your surface
This custom painted carpet was done over a new unfinished maple floor. If you are working over an already finished floor, we recommend that you have it professionally sanded to remove the existing topcoat so that you can paint directly onto the wood surface.
Prep your surface by sanding the floor. Wipe the floor clean of debris. Measure the room to find the center.
Use a chalk line to mark where the painted carpet area will be. Check the corners with a squared rule and mask outside the lines using painter’s tape. Check the dimensions with measuring tape.
Mix 1 part Duck Egg Blue Chalk Paint with 1 part Louis Blue Chalk Paint. Add an equal part of water to create a wash. Using a chip brush, apply wash to entire carpet area. Use cheesecloth to blot excess paint before it dries. Add more water as needed to keep the paint really thin. Apply a second coat and adjust the color as desired.
Because of the size of this pattern, the Modello® stencil comes in 4 sections. Burnish each section with a squeegee front and back. Carefully remove the backing paper of each section to make sure each element of the design detaches easily. Lay the sections in place and attach them together with painter’s tape. Center the taped stencil in the painted square. Note: We painted the square 1 inch large than the Modello® stencil.
Place a large piece of tape across the middle of each section to anchor it. Fold the Modello® stencil back and detach from the backing paper, stopping just before the painter’s tape. Cut the backing paper off and roll the Modello® stencil onto the floor using your hand to smooth it. Remove tape and repeat on the other side. The process is easier if you do small sections at a time.
Use a squeegee to remove any air bubbles and make sure the vinyl stencil is attached to the floor. Wet the top layer of transfer tape with a damp sponge to release the adhesive backing and make it easier to peel. Move slowly to make sure the stencil is releasing properly. Use your fingers or the squeegee to reapply any parts that want to life from the floor.
Each section comes with a number marking the placement order. Use painter’s tape to cover them so you don’t paint them. Trim about 1” of the backing paper off tile #2 and match the pattern to tile #1. Remove the backing paper and place the Modello® stencil pattern. Repeat the application process with the other Modello® stencil sections. Move elements into place or use small pieces of tape to fill in the pattern as needed.
Mask off the edge of the rug with painter’s tape. Use a nylon roller to paint the entire stencil with Coco Chalk Paint. Paint elements with Old Ochre Chalk Paint and 1” stencil brush. Mask off other areas with painter’s tape.
Use a 1” or smaller stencil brush to stencil over chose elements with Old Ochre Chalk Paint. Stipple Old White Chalk Paint onto the Old Ochre painted elements to create texture. Fix any elements accidentally painted over with a small painting brush.
After the paint has dried, use a picking tool to remove the Modello® stencil.
Use an electric sander to lightly distress the paint and create an aged fabric look. Remove dust with a damp cloth.
Load a nylon roller with Old Ochre Chalk Paint. Roll it over a needle point plastic canvas. Apply the canvas paint side down on the painted rug and roll to apply pressure. Flip the canvas and repeat. Apply more paint as needed. Repeat the process allover and allow to dry.
Sand areas that were overpainted and wipe away dust. Let dry.
Apply 2 coats of Annie Sloan Floor Lacquer with a foam roller. Let each coat dry.
There are so many pattern possibilities by using Modello® Stencils if you wish to decorate with more than just paint. Click here to buy Modello® stencils for decorating floors, walls, ceilings, and more!